Ace It: Sending automated reminders and follow-ups

30 March, 2022
image 4 v2

For many businesses, it can be incredibly helpful to send reminders to customers before a scheduled job, but it can add another layer of administrative hassle.

Alternatively, it is a great idea to send out follow-up messages to secure repeat business when it is time for another service, check-up or inspection. But the thought of manually going back through jobs from months ago lacks any appeal.  

Formitize can manage all of this for you with minimal effort and maximum efficiency! Just decide what kind of reminders you would like to set up (which will vary from business to business) and you’ll be on your way. 

image 3

HOW TO SET UP AUTOMATED REMINDERS 


To set up your job Type Template Reminders, go to “Jobs” in the menu running across the top of your Formitize Web Portal > Select “Job Type Templates” from the drop down list > Select an existing template to Edit, or use the green “+ New Job Type” button in the top right hand corner > Select the “Future Reminders”.

From this page, you can create and/or customize all of your automated reminders.

To get started on a new automated Reminder, click on the green “+” button in the top left hand corner, and select the type of communication you are wanting to use (Email, SMS, Letter, or Task):

image 4

The Email and SMS functions are the most commonly used functions within this page. You can of course have both an Email and an SMS sent out to your clients too. All that is required is two separate communications, one with Email selected, and the other with SMS.

The next step is to set the timeframe around when you want the message to be sent to your client. Two very common reminder timeframes include the day before the clients appointment, and six months after their appointment as a follow up:

(One day before the appointment):
image 5
(Six months after the appointment):
image 6

These time frames are very flexible, so you can customize this however you’d like!

The next step is to create the content of the message that you would like your client to receive, as shown below:

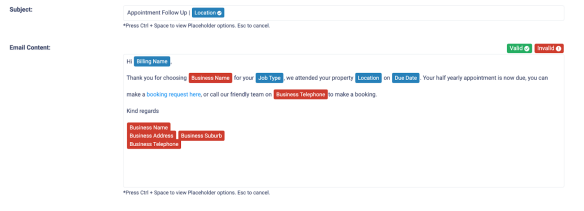
This is just one of the thousands of ways that you could configure a message like this. This field is an open text box, meaning you can type whatever message you would like. The coloured boxes that you can see within the message are what we call “Placeholders”. 

Placeholders are a very efficient way to pre-populate information within the message with no manual data entry involved. This is a great way to personalise the message for the person who it is being sent to also, meaning that it’s not just some general message that all of your clients receive. 

In the Example, the Client’s name, Job Details, and Business Details are being pre-populated within the message, but there are many more Placeholder options that you have access to. To access the Placeholder menu, just press Ctrl + Space wherever you are wanting to insert a Placeholder, and select the one that you are wanting to use.

Once you are finished creating the message, all you need to do is save the page, and your automated communications are now finished. Now that you have created the template, you can select that template when creating a job as many times as needed, and all of your communications will go out at the different timeframes that you’ve set. You can of course go back and edit these communications at any time. 

The beauty of it is that once you have created the template, you never have to think about your communications again, because the Formitize Smart Assist feature will take care of it for you 24/7, 365 days a year.